
Why Replace the Default Self-Signed Certificate in Proxmox VE?
When you install a fresh Proxmox VE hypervisor, it automatically generates and uses a self-signed certificate (signed by its own internal cluster CA) for the web management interface (pveproxy).
While this ensures that traffic between your browser and the Proxmox server is encrypted via HTTPS/TLS, self-signed certificates come with several practical downsides compared to certificates issued by a publicly trusted Certificate Authority (such as Let’s Encrypt):
- Browser security warnings
Modern web browsers display a prominent “Your connection is not private” or “NET::ERR_CERT_AUTHORITY_INVALID” warning because the certificate isn’t trusted by default. You must manually accept the risk each time (or install the CA certificate in your trust store — which isn’t practical for most users). - No real protection against man-in-the-middle (MITM) attacks
Anyone can generate a self-signed certificate with the same common name (or even forge one that looks similar). An attacker on the same network (or via DNS poisoning / ARP spoofing) could present their own self-signed certificate, and users might accept it without realizing the connection has been intercepted. - Longer validity period increases risk in case of compromise
Proxmox node certificates are typically valid for up to 2 years (while the internal root CA often lasts ~10 years). In contrast, Let’s Encrypt certificates expire after only 90 days. A longer validity window means that if the private key is ever leaked or compromised, the certificate remains usable by an attacker for a much longer time before it naturally expires.
For these reasons especially in home labs, remote access scenarios, or any environment where you want clean browser access without constant warnings replacing the default self-signed certificate with a trusted one (e.g., via Let’s Encrypt ACME) is highly recommended. Proxmox makes this straightforward through its built-in ACME (Automatic Certificate Management Environment) client support.
In this tutorial, I’ll request certificates using ACME’s DNS-01 challenge. This means we’ll authenticate domain ownership through DNS validation rather than the default HTTP-01 challenge.
With the HTTP-01 method, your server must be publicly reachable from the internet on port 80 (HTTP), as the certificate authority (e.g., Let’s Encrypt) needs to access a specific validation file at a well-known URL on your domain. That’s not ideal for my HomeLab setup, since I prefer to avoid exposing my server directly to the outside world.
Instead, the DNS-01 challenge works by temporarily adding a special TXT record to the DNS zone of the domain you’re requesting the certificate for. The certificate authority checks for the presence of this record to verify your control over the domain. Once validated, it issues the certificate all without requiring any inbound connections to your server.
This approach is especially useful for internal/home networks, wildcard certificates, or any scenario where you want to keep port 80 closed externally.
How to Obtain Let’s Encrypt Certificates using ClouDNS DNS-01 Challenge
My HomeLab domain uses ClouDNS.net as its DNS provider. One major advantage of ClouDNS is full access to their HTTP API, which integrates perfectly with the ACME DNS-01 challenge for fully automated certificate requests and renewals no need to expose port 80 or run a temporary web server.
Security Best Practice: Create a Limited API Sub-User
To minimize risk in case the API credentials are ever compromised, the first step is to create a dedicated API sub-user with access restricted only to the specific domain/zone(s) used by your HomeLab.
ClouDNS supports this natively. Follow their official guide here: Access and Authentication – How to Create an API Sub-User
Steps to Enroll a New Let’s Encrypt Certificate in Proxmox
- Create an ACME account in Proxmox and register it with Let’s Encrypt
- Create a DNS-01 Challenge Plugin configured for ClouDNS
- Specify the Fully Qualified Domain Name (FQDN) for your Proxmox server
- Requesting / Renewing the Certificate
Steps 1 & 2: Log in and access ACME settings at the Datacenter level.
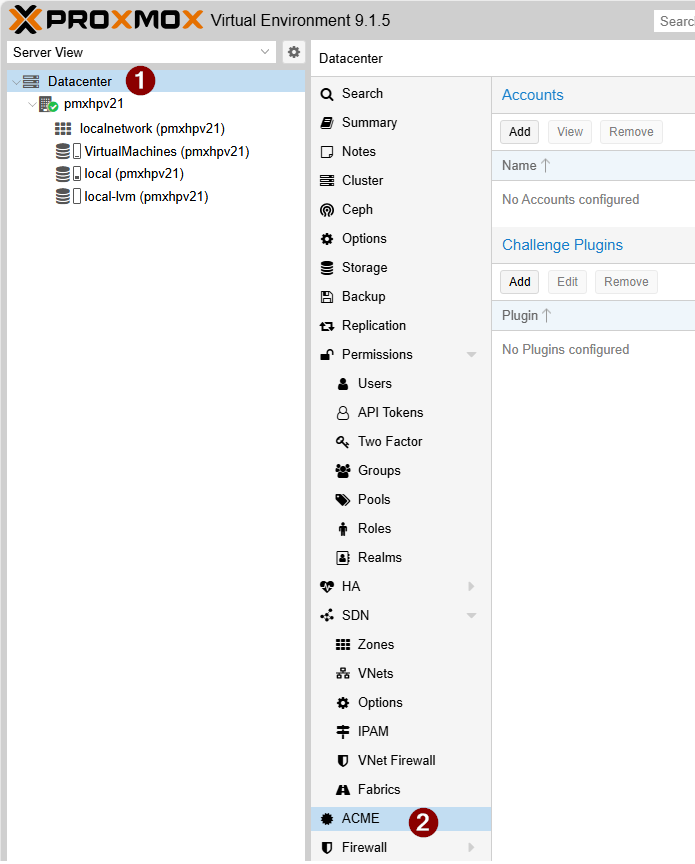
1. Create an ACME account in Proxmox and register it with Let’s Encrypt
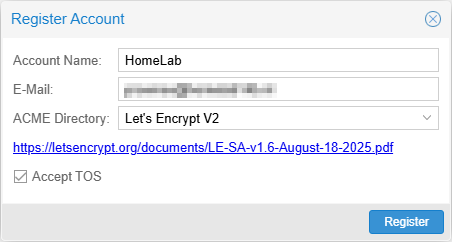
Click on “Add” in the Accounts section.
Specify an Account Name and an E-Mail for this account. Make sure that you check the Accept TOS checkbox other wise the account registration will fail.
2. Create a DNS-01 Challenge Plugin configured for ClouDNS
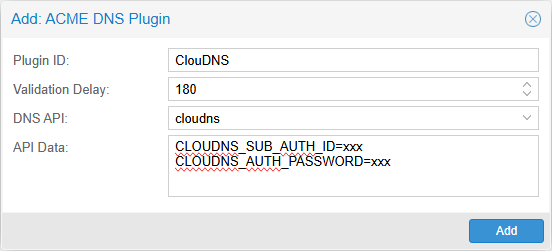
Click on “Add” in the Challenge Plugins section.
Specify an name for the Plugin ID. Set a Validation Delay (timeout) that ClouDNS needs to propagate the new DNS entry across all servers in the world. It can take up between 1 and 3 minutes (180 seconds) before this process is complete. It depend on what kind of zone / account you have with ClouDNS. The paid ones have 60+ Anycast DNS servers, instead of the free account who only have 4 servers.
In the API Data part specify the (Sub) API user and Password.
Steps 3 & 4 Access Certificates at server level
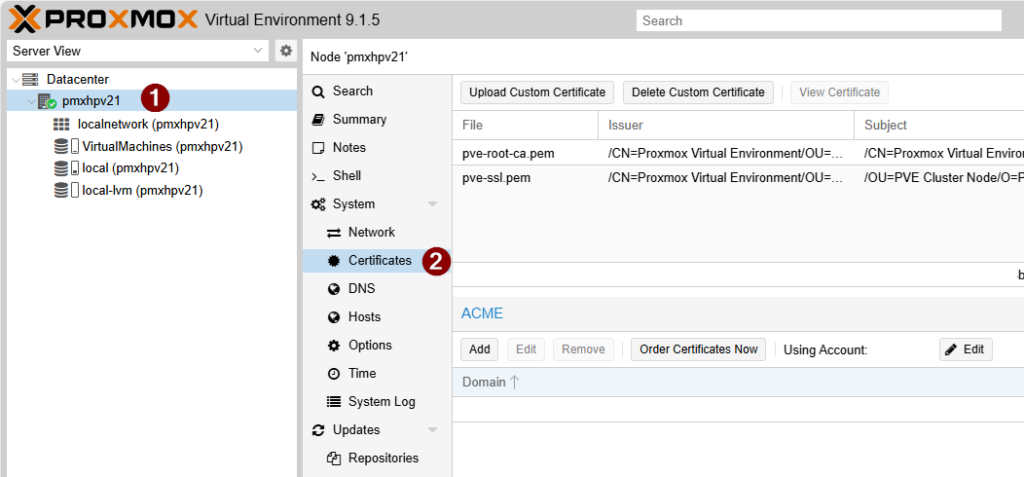
3. Specify the Fully Qualified Domain Name (FQDN) for your Proxmox server
In the ACME section click on “Edit” to select the ACME account we created in step 1. Click “Apply” to start using this account.

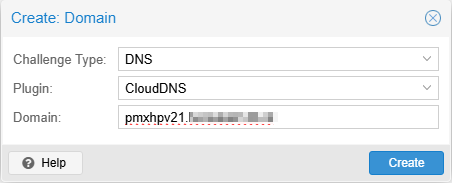
Next click on “Add” in the ACME section to specify for what FQDN we want to request a certificate.
As Challenge Type choose DNS and set the plugin to the plugin we created in step 2.
Specify a Domain (FQDN). Make sure this FQDN can be resolved on the internal network. Otherwise you still will get certificate errors in your browser when visiting the management interface of the Proxmox server.
Press “Create” to save the request.
4. Requesting / Renewing the Certificate
The final step is to click “Order Certificates Now” in the ACME section to request a new certificate from Let’s Encrypt.
Once the process completes successfully without any errors, the web management interface will automatically restart and begin using the new certificate.
With ACME configured, Proxmox VE will automatically attempt to renew the certificate when it has less than 30 days of validity remaining (typically after about 60 days for a 90-day Let’s Encrypt certificate). This is handled by the pve-daily-update service, which runs daily. No manual intervention is required under normal circumstances. If a renewal attempt fails, the system will retry on subsequent days until the certificate is successfully renewed or expires.